Raspberry Pi 2 试用 Windows IOT
趁着端午节这空闲的三天,想试试在Raspberry Pi 2上的Windows IOT系统。然而,过程花费了一天多:
- 安装Windows 10
- 买MicroSD卡(之前的都是SDHC)
- 安装Windows IOT
- 安装Visual Studio 2015
必备条件
官网在Github上给了一堆具备条件,主要就是
- Windows 10
- Raspberry Pi 2
- 网线连接的网络
安装Windows IOT
2.下载适用于 Raspberry Pi 2 的 Windows 10 IoT Core Insider Preview 映像
3.用Microsoft Transfer 下载映像
4.插入SD卡,将映像应用到SD卡,即:
dism.exe /Apply-Image /ImageFile:flash.ffu /ApplyDrive:\\.\\PhysicalDriveN /SkipPlatformCheckPhysicalDriveN是SD卡的磁盘号,可以用下面的命令得到结果:
diskpart

list disk

exit
等这个过程结束。
5.安装WindowDeveloperProgramForIoT
Raspberry Pi 2 使用Windows IOT
-
接上网线和电源
-
等几分钟,接着,我们就可以
Windows 10 IoT Core Insider Preview中看到设备的IP。
3.打开对应的IP就会有下面的结果:
无奈的是对Mac的支持不好~~
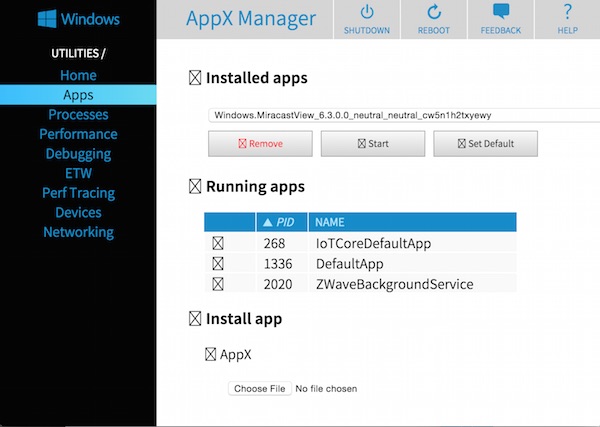
Windows IOT菜单列表
Home: 默认是空白的,应该相当于Dashboard
Apps: 设备上安装的应用
Processes: 当前正在运行的进程
Performance:CPU和IO的监视
Debugging: 调试用
ETW: Realtime ETW Tracing
Perf Tracing:
Devices: 设备管理器
Networking: 网络,可以用于连接Wifi等。
Windows IOT PowerShell登陆
1.启用WinRM服务
PS C:\> net start WinRM2.信任设备(以设备的IP代换<machine-name or IP Address>)
PS C:\> Set-Item WSMan:\localhost\Client\TrustedHosts -Value <machine-name or IP Address>3.Session之前,据说是个bug
PS C:\> remove-module psreadline -force4.进入Session和ssh类似
PS C:\> Enter-PsSession -ComputerName <machine-name or IP Address> -Credential <machine-name or IP Address or localhost>\Administrator其他命令
如IotStartup,可以用于配置启动应用。
或许您还需要下面的文章:
围观我的Github Idea墙, 也许,你会遇到心仪的项目
- 设计流动摩擦:AI 原生团队的核心能力
- Piece:将 Coding Agent 的局部构建反馈提速 10x
- 验证工程:从 Vibe 硬件编程 Loop 到自迭代验证
- 长程验证:AI Agent 长任务的收敛机制
- 从复杂编辑器到 Agent 工作台:Office 的 Cursor 时刻
- 注意力 Harness:多 Agent 时代如何守住人的注意力
- Agent 应该如何解决繁杂任务:从 /goal 到长时间运行
- 任务自适应 Harness:从 Trace 到多 Coding Agent 的协作记忆
- 从写清 Spec 到看懂功能:在 Session 历史中使用 Routa 重建需求全景
- Routa 桌面版发布:内建 Harness 工程的 AI Coding 研发协作工作台
 Engineer, Consultant, Writer, Designer
ThoughtWorks 技术专家
工程师 / 咨询师 / 作家 / 设计学徒
开源深度爱好者
出版有《前端架构:从入门到微前端》、《自己动手设计物联网》、《全栈应用开发:精益实践》
联系我: h@phodal.com
微信公众号: 最新技术分享

- opensuse (10)
- django (41)
- arduino (10)
- thoughtworks (18)
- centos (9)
- nginx (18)
- java (10)
- SEO (9)
- iot (47)
- iot system (12)
- RESTful (23)
- refactor (17)
- python (47)
- mezzanine (15)
- test (11)
- design (16)
- linux (14)
- tdd (12)
- ruby (14)
- github (24)
- git (10)
- javascript (52)
- android (36)
- jquery (18)
- rework (13)
- markdown (10)
- nodejs (24)
- google (8)
- code (9)
- macos (9)
- node (11)
- think (8)
- beageek (8)
- underscore (14)
- ux (8)
- microservices (10)
- rethink (9)
- architecture (37)
- backbone (19)
- mustache (9)
- requirejs (11)
- CoAP (21)
- aws (10)
- dsl (9)
- ionic (25)
- Cordova (21)
- angular (16)
- react (14)
- ddd (9)
- summary (9)
- growth (10)
- frontend (14)
- react native (8)
- serverless (32)
- rust (9)
- llm (8)