Ionic Android应用开发《程序语言答人》——Router
在上一篇Ionic Android应用开发《程序语言答人》中简单地介绍了一下开始的流程,接着我们来说说Router。
UI Router
AngularUI Router is a routing framework for AngularJS, which allows you to organize the parts of your interface into a state machine. Unlike the $route service in the Angular ngRoute module, which is organized around URL routes, UI-Router is organized around states, which may optionally have routes, as well as other behavior, attached.
有这样的一个中文介绍
AngularUI Router是AngularJS的路由框架,和默认的$route不同,它将所有路由包装成可划分层级的状态机状态,路由路径在ui-router中不是必须的。由于ui-router的路由状态机是分层级的,所以使用ui-router可以非常方便地创建包含多个嵌入的子模板。
一个简单的路由如下所示:
.state('app', {
    url: "/app",
    abstract: true,
    templateUrl: "templates/menu.html"
})
即有URL、模板,而对于一个复杂的Ionic的Router来说是这样子的
    .state('app.wiki', {
    url: "/wiki",
    views: {
        'menuContent': {
            templateUrl: "templates/wiki.html",
            controller: 'WikiCtrl'
        }
    }
})
即带有Controller,一个完整的Router还会有一个默认的路由
$urlRouterProvider.otherwise('/app/level');Router路由
/app/level对应的路由是:
.state('app.levelSelect', {
  url: "/level",
  views: {
    'menuContent': {
      templateUrl: "templates/level.html",
      controller: 'LevelSelectCtrl'
    }
  }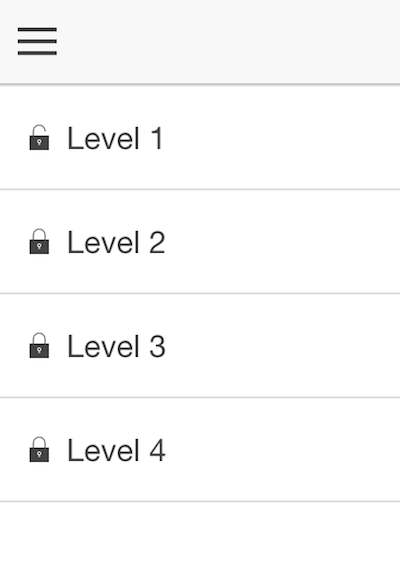
})level.html的内容如下所示:
<ion-view view-title="选择级别">
<ion-content>
<ion-list>
<ion-item ng-repeat="level in levels" href="#/app/level/{{level.id}}">
<div ng-if="level.id == 1 ">
<i class="icon ion-ios-unlocked"></i> {{level.title}}
</div>
<div ng-if="level.id != 1 ">
<i class="icon ion-ios-locked"></i> {{level.title}}
</div>
</ion-item>
</ion-list>
</ion-content>
</ion-view>而LevelSelectCtrl如下所示:
.controller('LevelSelectCtrl', function ($scope) {
    if (typeof analytics !== 'undefined') {
        analytics.trackView("LevelSelectCtrl");
    }
    $scope.levels = [
        {title: 'Level 1', id: 1},
        {title: 'Level 2', id: 2},
        {title: 'Level 3', id: 3},
        {title: 'Level 4', id: 4}
    ];
})
Controller做的事,似乎就是将数据放到模板,接着渲染~~,就会有如下的结果。
当我们选择level1时,逻辑就来到了
  .state('app.single', {
    url: "/level/:level",
    views: {
      'menuContent': {
        templateUrl: "templates/level_quiz.html",
        controller: 'QuizCtrl'
      }
    }
  })
这就是一个简单的页面间的跳转与Router的关系。
其他
或许您还需要下面的文章:
围观我的Github Idea墙, 也许,你会遇到心仪的项目
- 验证工程:从 Vibe 硬件编程 Loop 到自迭代验证
- 长程验证:AI Agent 长任务的收敛机制
- 从复杂编辑器到 Agent 工作台:Office 的 Cursor 时刻
- 注意力 Harness:多 Agent 时代如何守住人的注意力
- Agent 应该如何解决繁杂任务:从 /goal 到长时间运行
- 任务自适应 Harness:从 Trace 到多 Coding Agent 的协作记忆
- 从写清 Spec 到看懂功能:在 Session 历史中使用 Routa 重建需求全景
- Routa 桌面版发布:内建 Harness 工程的 AI Coding 研发协作工作台
- Harness Monitor:当多个 Agent 同时写代码时,如何看住质量
- Gate First:为你的 Agent Team 构建 Harness 防御体系
 Engineer, Consultant, Writer, Designer
ThoughtWorks 技术专家
工程师 / 咨询师 / 作家 / 设计学徒
开源深度爱好者
出版有《前端架构:从入门到微前端》、《自己动手设计物联网》、《全栈应用开发:精益实践》
联系我: h@phodal.com
微信公众号: 最新技术分享

- opensuse (10)
- django (41)
- arduino (10)
- thoughtworks (18)
- centos (9)
- nginx (18)
- java (10)
- SEO (9)
- iot (47)
- iot system (12)
- RESTful (23)
- refactor (17)
- python (47)
- mezzanine (15)
- test (11)
- design (16)
- linux (14)
- tdd (12)
- ruby (14)
- github (24)
- git (10)
- javascript (52)
- android (36)
- jquery (18)
- rework (13)
- markdown (10)
- nodejs (24)
- google (8)
- code (9)
- macos (9)
- node (11)
- think (8)
- beageek (8)
- underscore (14)
- ux (8)
- microservices (10)
- rethink (9)
- architecture (37)
- backbone (19)
- mustache (9)
- requirejs (11)
- CoAP (21)
- aws (10)
- dsl (9)
- ionic (25)
- Cordova (21)
- angular (16)
- react (14)
- ddd (9)
- summary (9)
- growth (10)
- frontend (14)
- react native (8)
- serverless (32)
- rust (9)
- llm (8)