Serverless 应用开发指南:基于 Serverless 的 GitHub Webhook
当我们没有服务器,又想要一个 Webhook 来触发我们一系列的操作的时候。我们就可以考虑使用 Serverless,我们不需要一直就这么支付一个服务器的费用。通过 Serverless,我们就可以轻松完成这样的工作,并且节省大量的费用。
GitHub 上的 Webhook 允许我们构建或设置在 GitHub.com 上订阅某些事件的 GitHub 应用程序。当触发这些事件之一时,我们将向 webhook 配置的 URL 发送 HTTP POST 有效内容。
比如说,当我们 PUSH 了代码,我们想触发我们的持续集成。这个时候,就可以通过一个 Webhook 来做这样的事情。
Serverless GitHub Webhook
同样的,对于这个示例来说,我们还将采用官方的示例——毕竟自己从头写要花费大量的时间。
首先,安装服务到本地:
serverless install -u https://github.com/serverless/examples/tree/master/aws-node-github-webhook-listener -n github-webhook然后,替换 serverless.yml 文件中的REPLACE-WITH-YOUR-SECRET-HERE:
provider:
  name: aws
  runtime: nodejs4.3
  environment:
    GITHUB_WEBHOOK_SECRET: REPLACE-WITH-YOUR-SECRET-HERE
你可以先随便填写一个值,或者采用什么任意的加密算法,来生成相关的密钥。
注意:请保存好这个密钥。
然后执行部署:
serverless deploy.................................
Serverless: Stack update finished...
Serverless: Invoke aws:info
Service Information
service: github-webhook
stage: dev
region: us-east-1
stack: github-webhook-dev
api keys:
None
endpoints:
POST - https://kx2zlcnt51.execute-api.us-east-1.amazonaws.com/dev/webhook
functions:
githubWebhookListener: github-webhook-dev-githubWebhookListener
Serverless: Invoke aws:deploy:finalize这个时候,就会生成相应的 Lambda 函数的地址,将地址填入到 GitHub 相关项目的配置中。
如,我想为我的 Serverless 项目:https://github.com/phodal/serverless-guide,设置一个 Hook 监控。
只需要再将密钥和 API 地址填入 GitHub 后台里。在这里,就是:https://github.com/phodal/serverless-guide/settings/hooks

可以勾上 push 等事件用来测试。
然后,可以 push 代码,并观查日志。
serverless logs -f githubWebhookListener -t代码
这里的配置代码 serverless.yml,也相对比较简单:
配置:
service: github-webhook

provider:
  name: aws
  runtime: nodejs4.3
  environment:
    GITHUB_WEBHOOK_SECRET: blablabla

functions:
  githubWebhookListener:
    handler: handler.githubWebhookListener
    events:
      - http:
          path: webhook
          method: post
          cors: true
主要逻辑都是在 handler.js 文件中:
const crypto = require('crypto');

function signRequestBody(key, body) {
  return `sha1=${crypto.createHmac('sha1', key).update(body, 'utf-8').digest('hex')}`;
}

module.exports.githubWebhookListener = (event, context, callback) => {
  var errMsg; // eslint-disable-line
  const token = process.env.GITHUB_WEBHOOK_SECRET;
  const headers = event.headers;
  const sig = headers['X-Hub-Signature'];
  const githubEvent = headers['X-GitHub-Event'];
  const id = headers['X-GitHub-Delivery'];
  const calculatedSig = signRequestBody(token, event.body);

  if (typeof token !== 'string') {
    errMsg = 'Must provide a \'GITHUB_WEBHOOK_SECRET\' env variable';
    return callback(null, {
      statusCode: 401,
      headers: { 'Content-Type': 'text/plain' },
      body: errMsg,
    });
  }

  if (!sig) {
    errMsg = 'No X-Hub-Signature found on request';
    return callback(null, {
      statusCode: 401,
      headers: { 'Content-Type': 'text/plain' },
      body: errMsg,
    });
  }

  if (!githubEvent) {
    errMsg = 'No X-Github-Event found on request';
    return callback(null, {
      statusCode: 422,
      headers: { 'Content-Type': 'text/plain' },
      body: errMsg,
    });
  }

  if (!id) {
    errMsg = 'No X-Github-Delivery found on request';
    return callback(null, {
      statusCode: 401,
      headers: { 'Content-Type': 'text/plain' },
      body: errMsg,
    });
  }

  if (sig !== calculatedSig) {
    errMsg = 'X-Hub-Signature incorrect. Github webhook token doesn\'t match';
    return callback(null, {
      statusCode: 401,
      headers: { 'Content-Type': 'text/plain' },
      body: errMsg,
    });
  }

  /* eslint-disable */
  console.log('---------------------------------');
  console.log(`Github-Event: "${githubEvent}" with action: "${event.body.action}"`);
  console.log('---------------------------------');
  console.log('Payload', event.body);
  /* eslint-enable */

  // Do custom stuff here with github event data
  // For more on events see https://developer.github.com/v3/activity/events/types/

  const response = {
    statusCode: 200,
    body: JSON.stringify({
      input: event,
    }),
  };

  return callback(null, response);
};
简单地来说,都是一堆异常处理,然后才是我们的功能函数。
测试
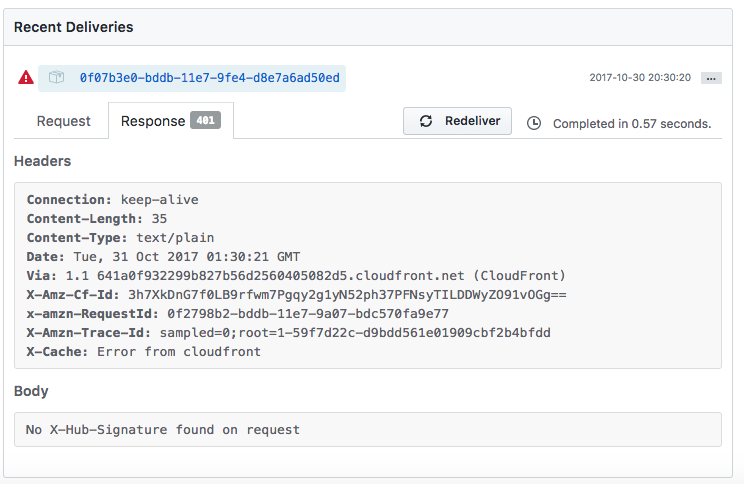
起先我刚测试的时候,没有配置好密钥,出现了一个 401 错误:

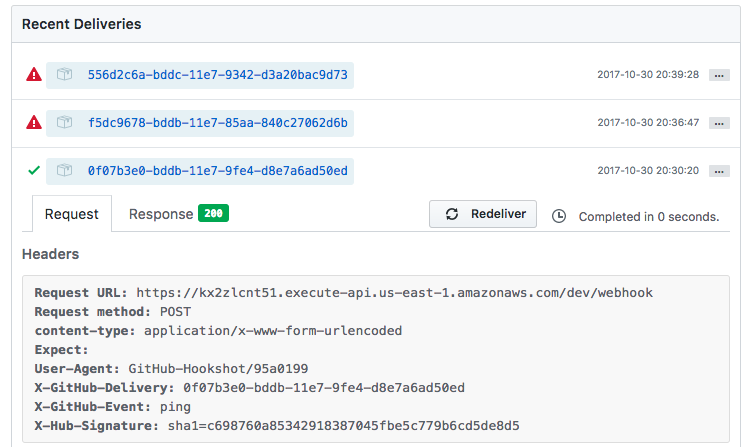
重新发了请求之后:

完了记得执行:
serverless remove下一步
当完成了这一步,我就可以准备制作一个 Serverless 到 S3 的博客系统,只要一 PUSH 代码,就自动构建。
或许您还需要下面的文章:
围观我的Github Idea墙, 也许,你会遇到心仪的项目
- 2025 年 AI 编程趋势:智能体 10 倍生产率放大下的“粪围”蔓延
- 2025 年 AI 驱动开发中的生产力与风险:10 倍悖论
- AutoDev Remote 编程智能体:你何必只让 AI 在白天分析需求、设计方案
- AutoDev 预上下文引擎:预生成代码语义化信息,构建 AI 编程的知识基座
- 两周 3 万行代码!我们的 7 个 AI “粪堆”求生编程实践
- AutoDev 智能开发驾驶舱|上下文驱动的 AI 编程开发者平台
- 预生成上下文:重构 RAG 的关键工程能力,构建企业级 AI 编程底座
- 预上下文生成:提升生成式 AI 代码生成效率的关键
- AI 友好架构:DevOps 平台 & 平台工程赋能 AI 自动编程
- AI 驱动的知识导航:通过平台工程提升开发者生产力
- opensuse (10)
- django (41)
- arduino (10)
- thoughtworks (18)
- centos (9)
- nginx (18)
- java (10)
- SEO (9)
- iot (47)
- iot system (12)
- RESTful (23)
- refactor (17)
- python (47)
- mezzanine (15)
- test (11)
- design (16)
- linux (14)
- tdd (12)
- ruby (14)
- github (24)
- git (10)
- javascript (52)
- android (36)
- jquery (18)
- rework (13)
- markdown (10)
- nodejs (24)
- google (8)
- code (9)
- macos (9)
- node (11)
- think (8)
- beageek (8)
- underscore (14)
- ux (8)
- microservices (10)
- rethink (9)
- architecture (37)
- backbone (19)
- mustache (9)
- requirejs (11)
- CoAP (21)
- aws (10)
- dsl (9)
- ionic (25)
- Cordova (21)
- angular (16)
- react (14)
- ddd (9)
- summary (9)
- growth (10)
- frontend (14)
- react native (8)
- serverless (32)
- rust (9)
- llm (8)

