Blog | Phodal - A Growth Engineerhttp://www.phodal.com/blog/2016-04-09T09:31:21.447700+00:00Blog打造基于GitHub的O2O应用:超炫的地图交互2016-04-09T03:13:56+00:002016-04-09T09:31:21.447700+00:00Phodal Huanghttp://www.phodal.com/blog/author/root/http://www.phodal.com/blog/create-github-o2o-application-map-with-province-city/或者你已经使用过了相应多的省市区与地图联动,但是这些联动往往是单向的、不可逆。并且这些数据往往都是在线使用的,不能离线使用。下图是一个结合百度地图的省市区与地图联动:
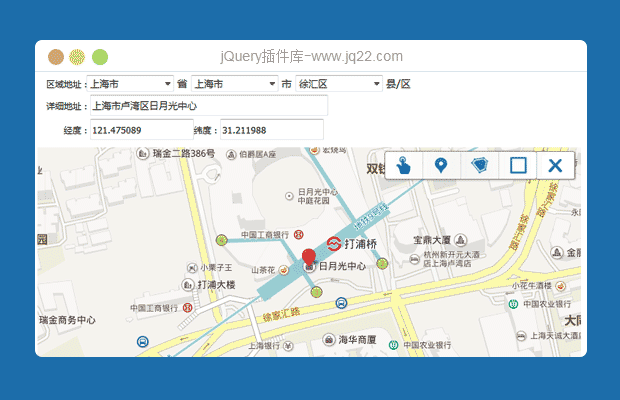
我们可以在这个应用里选择,相应的省市区然后地图会跳转到相应的地图。当我们在地图上漫游的时候,如果没有显示当前的省市区是不是变得很难使用。于是,我们就来创建一个吧:
相关技术栈:
- Bootstrap,UI显示~~,地球人都知道。
- jQuery,Bootstrap依赖。
- Require.js,模块化。
- Mustache,模板生成。
- Leaflet,交互地图库。
离线地图与搜索
---
在GitHub上搜索数据的过程中,发现了一个名为[d3js-geojson](https://github.com/ufoe/d3js-geojson)的项目里面放着中国详细省、市、县数据,并且还有及GeoJSON文件。
这就意味着两件事:
- 地图离线
- 多边形搜索
###地图离线
首先,我们要知道GeoJSON是怎样的一个存在。
> GeoJSON是一种对各种地理数据结构进行编码的格式,基于Javascript对象表示法的地理空间信息数据交换格式。GeoJSON对象可以表示几何、特征或者特征集合。GeoJSON支持下面几何类型:点、线、面、多点、多线、多面和几何集合。GeoJSON里的特征包含一个几何对象和其他属性,特征集合表示一系列特征。
换句话来说,根据这个文件里面的多边形,我们可以绘制出中国地图。由于上面的点是真实的地理位置信息,所以无论我们怎样的缩放这些点的位置都不会发生变化。如下图是GitHub对这个数据文件的解析:
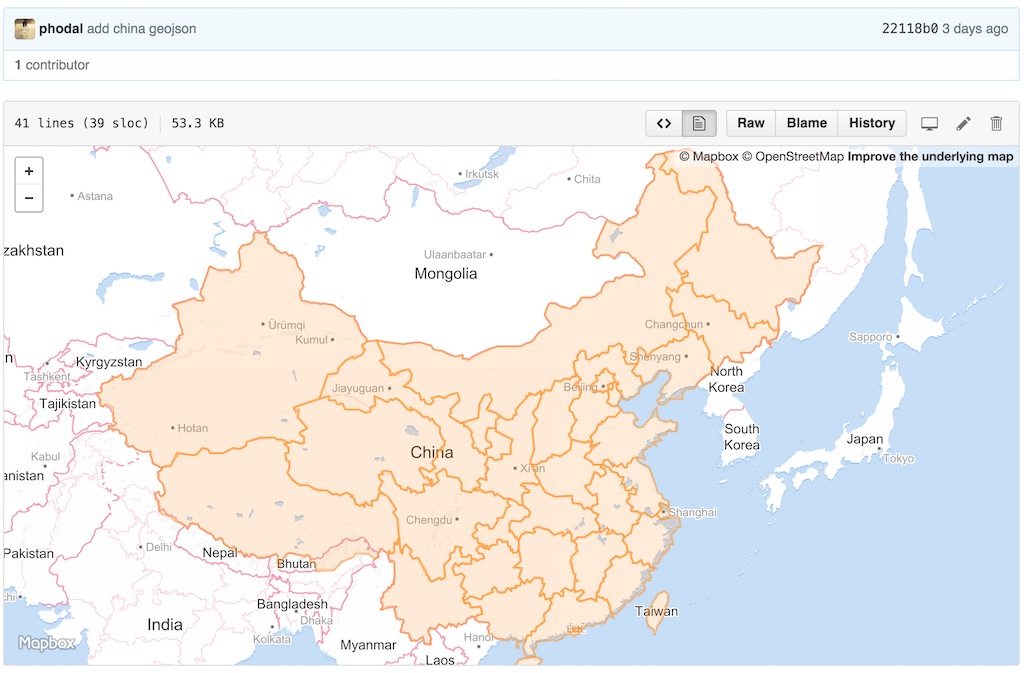
(PS: 预览可以打开这个页面:[Vmap GeoJSON](https://github.com/phodal/vmap/blob/gh-pages/static/data/china.json)
当然这似乎不是一个专业人员维护的数据,所以存在一些偏差。但是这些数据意味着,我们不需要依靠于在线地图就可以完成大部分的功能了。在线地图一直都是一个缓慢的存在,并且Google Map在多数人那都是不可用的。
接着问题来了,我们并没有把每个用户的数据存入到数据库中,那么我们怎么才能实现搜索?
###多边形搜索
所谓的多边形搜索就是画一个圈圈(任意多边形),然后你就可以去约这个圈圈里的人,如下图所示:
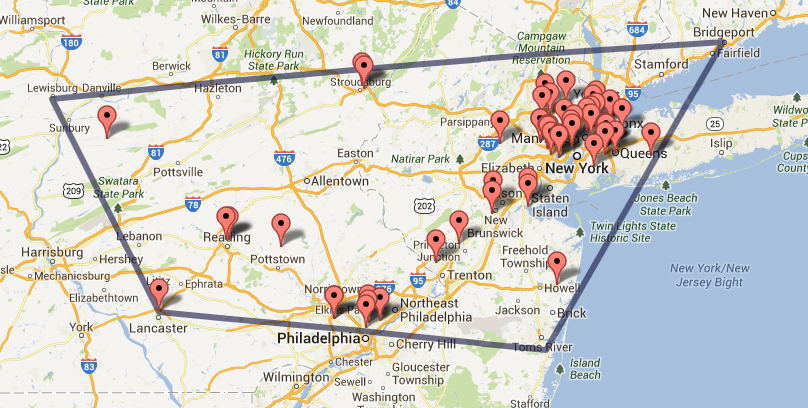
而圈圈搜索依赖于圈圈上的连续的点构建的形状来进行搜索,上面的每个点都包含了相应的经纬度。因此,只要是在这个圈圈里的用户都是可以搜索得到的。
这样实现的前提是:
- 要有一个支持多边形搜索的搜索引擎,如ElasticSearch、Solr、MongoDB等等。
- 要将用户的数据成功地存成GEO信息。
详细信息可以见: [VMap Bot](https://github.com/phodal/vmap-bot)
从地点到地图上显示
---
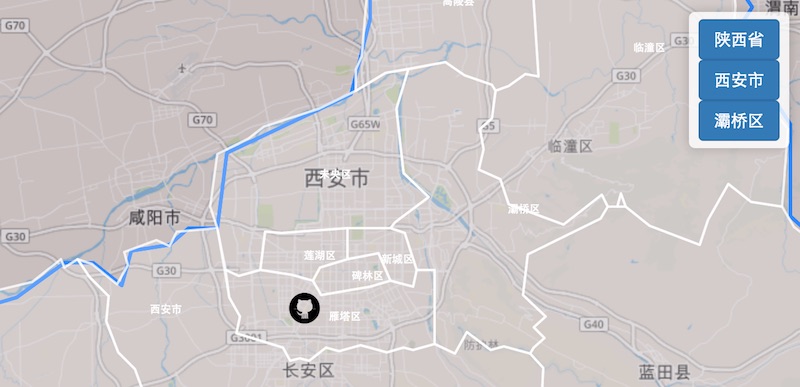
拿Bootstrap实现一个Dropdown是一件很容易的事,我们只要动用一下相应的模板就好了。难就难在,如果去与地图交互。
最初的时候要用Event的形式来实现,但是发现这样似乎会让其紧耦合。就改用了监听Hash Change的形式来实现,在总的地图上每一个省都有一个对应的ID,这个ID会对应相应的省的数据。如下图所示:
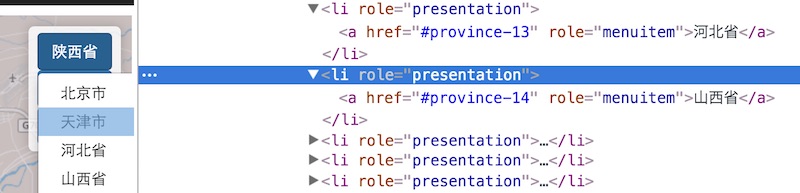
接着,我们就需要从这个Hash中判断它的级别和ID,随后转由相应的函数来处理这些逻辑即可。随后,我们要做两件事:
- 创建对应省的市的Dropdown
- 从地图上跳转到省
创建对应省的市的Dropdown,我们只需要根据地点重新生成一个新的Menu再插入即可。
从地图上跳转到对应的省的时候:
1. 用Aajx请求获取这个省的GeoJSON文件
2. 获取这个市的中心位置,并对其进行缩放
3. 将上面的每个市绘制到地图上
在这个过程中遇到的最大的坑是:中国有北京、上海、天津、重庆等直辖市,还有港、澳等自治区(PS:台湾是一个省)。对于这些特殊的地点,那么的缩放级别肯定会更高。
同理,我们也可以对上面的市运行处理。但是因为这些市并不存在GEO信息,所以我只是从其多连形信息取了一个点,再将这个点放到data-geo中:
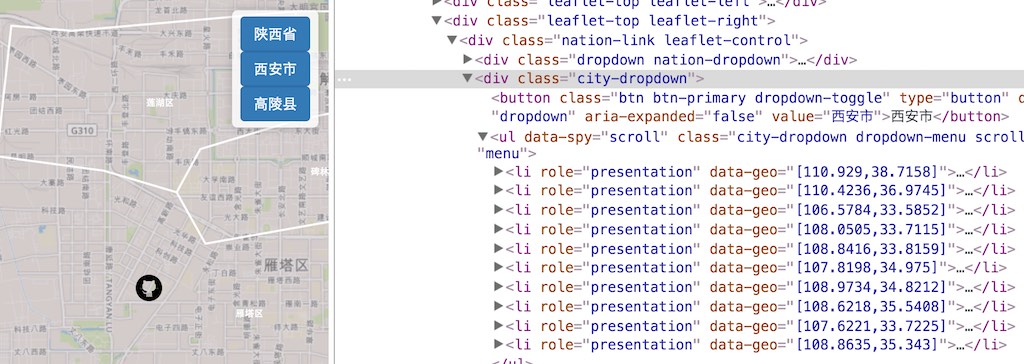
对应于省市的,对于区的处理也是如此。这样,我们就完成了地点到地图的显示了。
从地图到地点上显示
---
从地图上到地点就比较简单了,点击时修改对应的text即可。

Demo
---
在线Demo见: [http://vmap.phodal.com/](http://vmap.phodal.com/)
Github连击200天ShowCase2015-05-09T15:47:33+00:002015-05-10T08:02:00.658022+00:00Phodal Huanghttp://www.phodal.com/blog/author/root/http://www.phodal.com/blog/github-200-longest-streak-showcase/今天是我连续泡在Github上的第200天,也是蛮高兴的,终于到达了:
![Github 200 days][1]
故事的背影是: 去年国庆完后要去印度接受毕业生培训——就是那个神奇的国度。但是在去之前已经在项目待了九个多月,项目上的挑战越来越少,在印度的时间又算是比较多。便给自己设定了一个长期的goal,即100~200天的longest streak。
或许之前你看到过一篇文章[让我们连击](https://github.com/phodal/github-roam/blob/master/chapters/12-streak-your-github.md),那时已然140天,只是还是浑浑噩噩。到了今天,渐渐有了一个更清晰地思路。
先让我们来一下ShowCase,然后再然后,下一篇我们再继续。
##一些项目简述
上面说到的培训一开始是用Java写的一个网站,有自动测试、CI、CD等等。由于是内部组队培训,代码不能公开等等因素,加之做得无聊。顺手,拿Node.js +RESTify 做了Server,Backbone + RequireJS + jQuery 做了前台的逻辑。于是在那个日子里,也在维护一些旧的repo,如[iot-coap](https://github.com/phodal/iot-coap)、[iot](https://github.com/phodal/iot),前者是我拿到WebStorm开源License的Repo,后者则是毕业设计。
对于这样一个项目也需要有测试、自动化测试、CI等等。CI用的是Travics-CI。总体的技术构架如下:
####技术栈
前台:
- Backbone
- RequireJS
- Underscore
- Mustache
- Pure CSS
后台:
- RESTify
测试:
- Jasmine
- Chai
- Sinon
- Mocha
- Jasmine-jQuery
一直写到五星期的培训结束, 只是没有自动部署。想想就觉得可以用github-page的项目多好~~。
过程中还有一些有意思的小项目,如:
###google map solr polygon 搜索
[google map solr polygon 搜索](http://www.phodal.com/blog/google-map-width-solr-use-polygon-search/)
![google map solr][2]
代码: [https://github.com/phodal/gmap-solr](https://github.com/phodal/gmap-solr)
###技能树
这个可以从两部分说起:
#### 重构Skill Tree
原来的是
- Knockout
- RequireJS
- jQuery
- Gulp
![Skill Tree][3]
代码: [https://github.com/phodal/skillock](https://github.com/phodal/skillock)
####技能树Sherlock
- D3.js
- Dagre-D3.js
- jquery.tooltipster.js
- jQuery
- Lettuce
- Knockout.js
- Require.js
![Sherlock skill tree][4]
代码: [https://github.com/phodal/sherlock](https://github.com/phodal/sherlock)
###Django Ionic ElasticSearch 地图搜索
![Django Elastic Search][5]
- ElasticSearch
- Django
- Ionic
- OpenLayers 3
代码: [https://github.com/phodal/django-elasticsearch](https://github.com/phodal/django-elasticsearch)
###简历生成器
![Resume][6]
- React
- jsPDF
- jQuery
- RequireJS
- Showdown
代码: [https://github.com/phodal/resume](https://github.com/phodal/resume)
###Nginx 大数据学习
![Nginx Pig][7]
- ElasticSearch
- Hadoop
- Pig
代码: [https://github.com/phodal/learning-data/tree/master/nginx](https://github.com/phodal/learning-data/tree/master/nginx)
###其他
虽然技术栈上主要集中在Python、JavaScript,当然还有一些Ruby、Pig、Shell、Java的代码,只是我还是习惯用Python和JavaScript。一些用到觉得不错的框架:
- Ionic: 开始Hybird移动应用。
- Django: Python Web开发利器。
- Flask: Python Web开发小刀。
- RequireJS: 管理js依赖。
- Backbone: Model + View + Router。
- Angluar: ...。
- Knockout: MVV*。
- React: 据说会火。
- Cordova: Hybird应用基础。
还应该有:
- ElasticSearch
- Solr
- Hadoop
- Pig
- MongoDB
- Redis
[1]: /static/media/uploads/github-200-days.png
[2]: /static/media/uploads/screenshot.png
[3]: /static/media/uploads/skilltree.jpg
[4]: /static/media/uploads/screen_shot_2015-05-09_at_23.23.31.png
[5]: /static/media/uploads/elasticsearch_ionit_map.jpg
[6]: /static/media/uploads/resume.png
[7]: /static/media/uploads/nginx_pig.jpg地图移动应用实战:Ionic OpenLayer 地图显示2015-04-26T09:55:52+00:002015-04-26T10:12:55.600323+00:00Phodal Huanghttp://www.phodal.com/blog/author/root/http://www.phodal.com/blog/django-elasticsearch-ionic-build-gis-application-show-on-map/在上一篇[《地图移动应用实战:Ionic ElasticSearch 搜索服务》](http://www.phodal.com/blog/ionic-searchview-django-elasticsearch-ionic-build-gis-application/)中我们说到了,如果创建一个搜索服务,以及使用搜索接口。接着,我们来将他们显示到地图上。
效果图:
![Ionic ElasticSearch Map Show][1]
##设计思路
1. 判断是否有上次记录的位置信息,如果有则将地图的中心设置为上次的位置。
2. 将位置添加到ElasticSearch的Query中。
3. 从ElasticSearch中获取数据,并解析Render到地图上。
##OpenLayer
> OpenLayers是一个用于开发WebGIS客户端的JavaScript包。OpenLayers 支持的地图来源包括Google Maps、Yahoo、 Map、微软Virtual Earth 等,用户还可以用简单的图片地图作为背景图,与其他的图层在OpenLayers 中进行叠加,在这一方面OpenLayers提供了非常多的选择。除此之外,OpenLayers实现访问地理空间数据的方法都符合行业标准。OpenLayers 支持Open GIS 协会制定的WMS(Web Mapping Service)和WFS(Web Feature Service)等网络服务规范,可以通过远程服务的方式,将以OGC 服务形式发布的地图数据加载到基于浏览器的OpenLayers 客户端中进行显示。OpenLayers采用面向对象方式开发,并使用来自Prototype.js和Rico中的一些组件。
###添加OpenLayer 3
1.下载OpenLayer
2.添加到``index.html``:
<script src="js/ol.js"></script>
##Ionic OpenLayer 地图显示:
###创建NSService
新建一个``MapCtrl``,需要用到``ESService``和 ``NSService``,NSService是官方示例中的一个函数,提供了一个``getRendererFromQueryString``方法。
.factory('NSService', function(){
var exampleNS = {};
exampleNS.getRendererFromQueryString = function() {
var obj = {}, queryString = location.search.slice(1),
re = /([^&=]+)=([^&]*)/g, m;
while (m = re.exec(queryString)) {
obj[decodeURIComponent(m[1])] = decodeURIComponent(m[2]);
}
if ('renderers' in obj) {
return obj['renderers'].split(',');
} else if ('renderer' in obj) {
return [obj['renderer']];
} else {
return undefined;
}
};
return {
"exampleNS": exampleNS
};
})
###创建基本地图显示
这里我们使用的是Bing地图:
var view = new ol.View({
center: map_center,
zoom: 4
});
var controls = ol.control.defaults({rotate: false});
var interactions = ol.interaction.defaults({altShiftDragRotate:false, pinchRotate:false});
var map = new ol.Map({
controls: controls,
interactions: interactions,
layers: [
new ol.layer.Tile({
source: new ol.source.BingMaps({
key: 'Ak-dzM4wZjSqTlzveKz5u0d4IQ4bRzVI309GxmkgSVr1ewS6iPSrOvOKhA-CJlm3',
culture: 'zh-CN',
imagerySet: 'Road'
})
})
],
renderer: NSService.exampleNS.getRendererFromQueryString(),
target: 'map',
view: view
});
一个简单的地图如上如示。
###获取当前位置
ngCordova有一个插件是``$cordovaGeolocation``,用于获取当前的位置。代码如下所示:
var posOptions = {timeout: 10000, enableHighAccuracy: true};
$cordovaGeolocation
.getCurrentPosition(posOptions)
.then(function (position) {
var pos = new ol.proj.transform([position.coords.longitude, position.coords.latitude], 'EPSG:4326', 'EPSG:3857');
$localstorage.set('position', [position.coords.latitude, position.coords.longitude].toString());
$localstorage.set('map_center', pos);
view.setCenter(pos);
}, function (err) {
console.log(err)
});
当获取到位置时,将位置存储到``localstorage``中。
###获取结果并显示
最后代码如下所示,获取解析后的结果,添加icon
ESService.search("", 0).then(function(results){
var vectorSource = new ol.source.Vector({ });
$.each(results, function(index, result){
var position = result.location.split(",");
var pos = ol.proj.transform([parseFloat(position[1]), parseFloat(position[0])], 'EPSG:4326', 'EPSG:3857');
var iconFeature = new ol.Feature({
geometry: new ol.geom.Point(pos),
name: result.title,
phone: result.phone_number,
distance: result.distance
});
vectorSource.addFeature(iconFeature);
});
var iconStyle = new ol.style.Style({
image: new ol.style.Icon(({
anchor: [0.5, 46],
anchorXUnits: 'fraction',
anchorYUnits: 'pixels',
opacity: 0.75,
src: 'img/icon.png'
}))
});
var vectorLayer = new ol.layer.Vector({
source: vectorSource,
style: iconStyle
});
map.addLayer(vectorLayer);
});
###添加点击事件
在上面的代码中添加:
var element = document.getElementById('popup');
var popup = new ol.Overlay({
element: element,
positioning: 'bottom-center',
stopEvent: false
});
map.addOverlay(popup);
map.on('click', function(evt) {
var feature = map.forEachFeatureAtPixel(evt.pixel,
function(feature, layer) {
return feature;
});
if (feature) {
var geometry = feature.getGeometry();
var coord = geometry.getCoordinates();
popup.setPosition(coord);
$(element).popover({
'placement': 'top',
'html': true,
'content': "<h4>商品:" + feature.get('name') + "</h4>" + '' +
'<div class="button icon-left ion-ios-telephone button-calm button-outline">' +
'<a ng-href="tel: {{result.phone_number}}">' + feature.get('phone') + '</a> </div>' +
"<p class="icon-left ion-ios-navigate"> " + feature.get('distance') + "公里</p>"
});
$(element).popover('show');
} else {
$(element).popover('destroy');
}
});
当用户点击时,调用Bootstrap的Popover来显示信息。
##其他:
服务端代码: [https://github.com/phodal/django-elasticsearch](https://github.com/phodal/django-elasticsearch)
客户端代码: [https://github.com/phodal/ionic-elasticsearch](https://github.com/phodal/ionic-elasticsearch)
[1]: /static/media/uploads/elasticsearch_ionit_map.jpg地图移动应用实战:Ionic ElasticSearch 搜索服务 2015-04-26T06:30:27+00:002015-05-03T14:09:03.565719+00:00Phodal Huanghttp://www.phodal.com/blog/author/root/http://www.phodal.com/blog/ionic-searchview-django-elasticsearch-ionic-build-gis-application/在上一篇[《GIS 移动应用实战 —— Django Haystack ElasticSearch 构建》](http://www.phodal.com/blog/django-elasticsearch-ionic-build-gis-application-create-model/)中,我们构建了我们的服务端,可以通过搜索搜索到结果,这一篇,我们来构建一个简单的搜索。
最后效果如下图所示:
![Ionic ElasticSearch][1]
##开始之前
如果你没有Ionic的经验,可以参考一下之前的一些文章:[《HTML5打造原生应用——Ionic框架简介与Ionic Hello World》](http://www.phodal.com/blog/ionic-development-android-ios-windows-phone-application/)。
我们用到的库有:
- elasticsearch
- ionic
- ngCordova
将他们添加到``bower.json``,然后
bower install
吧
##Ionic ElasticSearch 创建页面
1.引入库
在``index.html``中添加
<script src="lib/elasticsearch/elasticsearch.angular.min.js"></script>
<script src="lib/ngCordova/dist/ng-cordova.js"></script>
接着开始写我们的搜索模板``tab-search.html``
```html
<ion-view ng-controller="SearchCtrl" view-title="搜索">
<ion-content>
<div id="search-bar">
<div class="item item-input-inset">
<label class="item-input-wrapper" id="search-input">
<i class="icon ion-search placeholder-icon"></i>
<input autocorrect="off" ng-change="search(query)" ng-model="query" placeholder="Search" type="search"/>
</label>
</div>
</div>
</ion-content>
</ion-view>
```
显示部分
```html
<ion-list>
<ion-item class="item-remove-animate item-icon-right" ng-repeat="result in results">
<h2 class="icon-left">{{result.title}}</h2>
<p>简介: {{result.body}}</p>
<div class="icon-left ion-ios-home location_info">
{{result.location_info}}
</div>
<div class="button icon-left ion-ios-telephone button-calm button-outline">
<a ng-href="tel: {{result.phone_number}}">{{result.phone_number}}</a>
</div>
</ion-item>
</ion-list>
```
而我们期待的``SearchCtrl``则是这样的
$scope.query = "";
var doSearch = ionic.debounce(function(query) {
ESService.search(query, 0).then(function(results){
$scope.results = results;
});
}, 500);
$scope.search = function(query) {
doSearch(query);
}
当我们点下搜索的时候,调用 ESService.
##Ionic ElasticSearch Service
接着我们就来构建我们的ESService,下面的部分来自网上:
angular.module('starter.services', ['ngCordova', 'elasticsearch'])
.factory('ESService',
['$q', 'esFactory', '$location', '$localstorage', function($q, elasticsearch, $location, $localstorage){
var client = elasticsearch({
host: $location.host() + ":9200"
});
var search = function(term, offset){
var deferred = $q.defer(), query, sort;
if(!term){
query = {
"match_all": {}
};
} else {
query = {
match: { title: term }
}
}
var position = $localstorage.get('position');
if(position){
sort = [{
"_geo_distance": {
"location": position,
"unit": "km"
}
}];
} else {
sort = [];
}
client.search({
"index": 'haystack',
"body": {
"query": query,
"sort": sort
}
}).then(function(result) {
var ii = 0, hits_in, hits_out = [];
hits_in = (result.hits || {}).hits || [];
for(;ii < hits_in.length; ii++){
var data = hits_in[ii]._source;
var distance = {};
if(hits_in[ii].sort){
distance = {"distance": parseFloat(hits_in[ii].sort[0]).toFixed(1)}
}
angular.extend(data, distance);
hits_out.push(data);
}
deferred.resolve(hits_out);
}, deferred.reject);
return deferred.promise;
};
return {
"search": search
};
}]
);
这个Service主要做的是创建ElasitcSearch Query,然后返回解析结果。
##运行
如果是要在真机上运行,需要处于同一网段,或者是部署到服务器上。
##其他:
服务端代码: [https://github.com/phodal/django-elasticsearch](https://github.com/phodal/django-elasticsearch)
客户端代码: [https://github.com/phodal/ionic-elasticsearch](https://github.com/phodal/ionic-elasticsearch)
[1]: /static/media/uploads/ionic_elasticsearch_search_view.jpg地图移动应用实战 —— 服务端构建2015-04-26T03:18:20+00:002015-06-15T05:15:10.593680+00:00Phodal Huanghttp://www.phodal.com/blog/author/root/http://www.phodal.com/blog/django-elasticsearch-ionic-build-gis-application-create-model/上一篇中我们说到了[Django Haystack ElasticSearch 环境准备](http://www.phodal.com/blog/django-elasticsearch-haystack-prepare-enviorment/),接着实战啦~~
官方有一个简单的文档说明空间搜索—— [Spatial Search](http://django-haystack.readthedocs.org/en/latest/spatial.html)
里面只有``Solr``和``ElasticSearch``是支持的,当然我们也不需要这么复杂的特性。
创建Django app名为nx,目录结构如下
.
|______init__.py
|____api.py
|____models.py
|____search_indexes.py
|____templates
| |____search
| | |____indexes
| | | |____nx
| | | | |____note_text.txt
api.py是后面要用的。
###Django Haystack Model创建
而一般的model没有什么区别,除了修改了save方法
from django.contrib import admin
from django.contrib.gis.geos import Point
from django.core import validators
from django.utils.translation import ugettext_lazy as _
from django.db import models
from pygeocoder import Geocoder
class Note(models.Model):
title = models.CharField("标题", max_length=30, unique=True)
latitude = models.FloatField(blank=True)
longitude = models.FloatField(blank=True)
def __unicode__(self):
return self.title
def save(self, *args, **kwargs):
results = Geocoder.geocode(self.province + self.city + self.address)
self.latitude = results[0].coordinates[0]
self.longitude = results[0].coordinates[1]
super(Note, self).save(*args, **kwargs)
def get_location(self):
return Point(self.longitude, self.latitude)
def get_location_info(self):
return self.province + self.city + self.address
admin.site.register(Note)
通过``Geocoder.geocode`` 解析用户输入的地址,为了方便直接后台管理了。
###创建search_index
在源码的目录下有一个``search_indexes.py``的文件就是用于索引用的。
from haystack import indexes
from .models import Note
class NoteIndex(indexes.SearchIndex, indexes.Indexable):
text = indexes.CharField(document=True, use_template=True)
title = indexes.CharField(model_attr='title')
location = indexes.LocationField(model_attr='get_location')
location_info = indexes.CharField(model_attr='get_location_info')
def get_model(self):
return Note
与些同时我们还需要在``templates/search/indexes/nx/``目录中有``note_text.txt``里面的内容是:
{{ object.title }}
{{ object.get_location }}
{{ object.get_location_info }}
##创建数据
migrate数据库
python manage.py migrate
run
python manage.py runserver
接着我们就可以后台创建数据了。 打开: http://127.0.0.1:8000/admin/nx/note/,把除了``Latitude``和``Longitude``以外的数据都一填——经纬度是自动生成的。就可以创建数据了。
###测试
访问 http://localhost:9200/haystack/_search
或者
curl -XGET http://127.0.0.1:9200/haystack/_search
##其他:
服务端代码: [https://github.com/phodal/django-elasticsearch](https://github.com/phodal/django-elasticsearch)
客户端代码: [https://github.com/phodal/ionic-elasticsearch](https://github.com/phodal/ionic-elasticsearch)
地图移动应用实战 —— Django Haystack ElasticSearch 环境准备2015-04-26T02:32:06+00:002015-05-25T01:29:47.124171+00:00Phodal Huanghttp://www.phodal.com/blog/author/root/http://www.phodal.com/blog/django-elasticsearch-haystack-prepare-enviorment/在一篇中,我们介绍了 [《Django ElasticSearch Ionic 打造 GIS 移动应用 —— 架构设计》](http://www.phodal.com/blog/django-elasticsearch-ionic-build-gis-application/)。接着,我们就开始实战了,内容也很简单。
##Django GIS准备
1.创建虚拟环境
virtualenv -p /usr/bin/python2.67 django-elasticsearch
2.创建项目
为了方便,这里用的是Mezzanine CMS,相比Django的主要优势是,以后扩展方便。但是对于Django也是可以的。
3.安装依赖
这里我的所有依赖有
django-haystack
Mezzanine==3.1.10
djangorestframework
pygeocoder
elasticsearch
安装
pip install requirements.txt
4.安装ElasticSearch
CentOS
wget https://download.elasticsearch.org/elasticsearch/elasticsearch/elasticsearch-1.4.2.zip
sudo unzip elasticsearch-1.4.2 -d /usr/local/elasticsearch
rm elasticsearch-1.4.2.zip
cd /usr/local/elasticsearch/elasticsearch-1.4.2/
./bin/plugin install elasticsearch/elasticsearch-cloud-aws/2.4.1
curl -XGET http://localhost:9200
Mac OS
brew install elasticsearch
5.Django Geo环境搭建
CentOS等GNU/Linux系统: 可以参照[CentOS Django Geo 环境搭建](http://www.phodal.com/blog/install-geo-django-in-centos/)
MacOS: [Mac OS Django Geo 环境搭建](http://www.phodal.com/blog/django-elasticsearch-geo-solution/)
##配置Django
###配置Haystack
HAYSTACK_SIGNAL_PROCESSOR = 'haystack.signals.RealtimeSignalProcessor'
HAYSTACK_CONNECTIONS = {
'default': {
'ENGINE': 'haystack.backends.elasticsearch_backend.ElasticsearchSearchEngine',
'URL': 'http://127.0.0.1:9200/',
'INDEX_NAME': 'haystack',
},
}
``HAYSTACK_SIGNAL_PROCESSOR``是为了可以实时处理。
``HAYSTACK_CONNECTIONS`` 则是配置搜索引擎用的。
###配置Django
在``settings.py``中的``INSTALLED_APPS``添加
"haystack",
"rest_framework",
接着
python manage.py createdb
python manage.py migreate
运行
python manage.py runserver
##其他:
服务端代码: [https://github.com/phodal/django-elasticsearch](https://github.com/phodal/django-elasticsearch)
客户端代码: [https://github.com/phodal/ionic-elasticsearch](https://github.com/phodal/ionic-elasticsearch)
AWS CentOS Django Geo 环境搭建2015-04-21T14:34:28+00:002015-04-21T14:49:07.056144+00:00Phodal Huanghttp://www.phodal.com/blog/author/root/http://www.phodal.com/blog/install-geo-django-in-centos/好不容易在电脑上开发完Application上线的时候,发现有一堆库没有装。。。
首先还是报了个
File "/home/www/nx2/nx2/nx/models.py", line 6, in <module>
from django.contrib.gis.geos import Point
ImportError: cannot import name Point
然后中间还有
File "/home/www/nx2/local/lib/python2.7/dist-packages/django/contrib/gis/geos/__init__.py", line 7, in <module>
from .libgeos import geos_version, geos_version_info, GEOS_PREPARE
File "/home/www/nx2/local/lib/python2.7/dist-packages/django/contrib/gis/geos/libgeos.py", line 58, in <module>
lgeos = CDLL(lib_path)
File "/usr/lib64/python2.7/ctypes/__init__.py", line 360, in __init__
self._handle = _dlopen(self._name, mode)
接着网上找了个教程,在AWS上安装Geo的教程:
##安装Geo编译依赖
yum install postgresql-libs postgresql postgresql-server postgresql-devel
sudo yum install gcc make gcc-c++ libtool libxml2-devel
接着我们需要编译下面这些软件
geos-3.3.5
proj-4.8.0
gdal-1.9.1
postgis-2.0.1
编译过程
cd /usr/local/src
wget http://download.osgeo.org/geos/geos-3.3.5.tar.bz2
tar xjf geos-3.3.5.tar.bz2
cd geos-3.3.5
./configure
make
sudo make install
# download, configure, make, install proj
wget http://download.osgeo.org/proj/proj-4.8.0.tar.gz
wget http://download.osgeo.org/proj/proj-datumgrid-1.5.zip
tar xzf proj-4.8.0.tar.gz
cd proj-4.8.0/nad
unzip ../../proj-datumgrid-1.5.zip
cd ..
./configure
make
sudo make install
# gdal, you may need to install svn (yum install svn)
svn checkout https://svn.osgeo.org/gdal/trunk/gdal gdal
cd gdal
./configure --with-python
make
sudo make install
# download, configure, make, install postgis
wget http://postgis.refractions.net/download/postgis-2.0.1.tar.gz
tar xzf postgis-2.0.1.tar.gz
cd postgis-2.0.1
./configure --with-geosconfig=/usr/local/bin/geos-config
make
sudo make install
最后,记得更新库
sudo -i
echo /usr/local/lib > /etc/ld.so.conf.d/postgis.conf # assumes your /etc/ld.so.conf loads all /etc/ld.so.conf.d/*.conf
ldconfig
exit
接着我们就可以愉快地使用Elastic Search + Django
</module></module></module>